In today’s competitive real estate market, first impressions are everything, and for many potential buyers, those impressions are formed online. Stunning property photos are not just an added bonus; they’re a necessity. Properly staging a home for photography can make all the difference in attracting interest and ultimately closing a sale. Here’s a guide to help realtors ensure their listings shine in every frame.
1. Declutter and Depersonalize
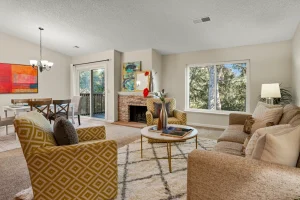
The goal of staging is to allow potential buyers to envision themselves in the space. Personal items like family photos, children’s artwork, and unique collectibles should be removed. Clear countertops, organize shelves, and ensure surfaces are free of unnecessary items. A clean, uncluttered space photographs much better and conveys a sense of spaciousness.
2. Clean Thoroughly
A spotless home is non-negotiable. Dust, dirt, and smudges are magnified in high-quality photographs. Ensure every room is meticulously cleaned, from the floors and windows to kitchen appliances and bathroom fixtures. Pay special attention to mirrors and glass surfaces to avoid distracting streaks.
3. Optimize Lighting
Lighting can make or break a photograph. Maximize natural light by opening curtains and blinds. Replace burnt-out bulbs and use daylight-balanced bulbs for consistency. Avoid harsh overhead lighting, which can cast unflattering shadows. If possible, schedule the photoshoot during the “golden hours” of early morning or late afternoon for the best natural light.
4. Highlight Key Features
Every home has unique selling points—perhaps it’s a fireplace, a gourmet kitchen, or a scenic view. Make sure these features are emphasized in the photos. Rearrange furniture or props to draw attention to these focal points and create a story that resonates with buyers.
5. Arrange Furniture Strategically
Furniture placement can significantly impact how a room looks in photos. Arrange pieces to make rooms appear open and inviting. Avoid overcrowding, and ensure there’s a clear flow. In smaller spaces, use appropriately scaled furniture to maximize the sense of space.
6. Add Finishing Touches
Small details can elevate the look of a home in photos. Fresh flowers, neatly folded towels, a bowl of fruit, or a stack of attractive books can add warmth and a lived-in feel without being overly personal. These touches help create a welcoming atmosphere.
7. Consider Color Coordination
Neutral tones often photograph better as they appeal to a wider audience. Remove overly bold or bright items that might distract from the room. Use accent colors sparingly to add visual interest without overwhelming the viewer.
8. Outdoor Spaces Matter
Don’t forget the exterior! Make sure the lawn is mowed, walkways are clear, and any outdoor furniture is clean and well-arranged. Remove trash bins, toys, or other distractions. If the property includes a garden, pool, or deck, ensure these areas are showcased as part of the photoshoot.
9. Collaborate with a Professional Photographer
A professional photographer understands how to capture a home’s best angles, lighting, and details. Invest in a skilled real estate photographer who can showcase the property at its absolute best. Their expertise can elevate even the simplest spaces.
10. Review and Edit
After the photoshoot, review the images carefully. Ensure they accurately represent the property while still highlighting its best features. Minor edits, such as adjusting brightness or cropping, can enhance the photos without misleading potential buyers.
Conclusion
Staging a home for photography is an art and a science, but with thoughtful preparation, realtors can create compelling images that captivate potential buyers. By following these tips, you’ll not only make your listings stand out but also set the stage for a successful sale.
Frequently Asked Questions: Staging for Photography
What are the top things to do before a real estate photo shoot?
Declutter every visible surface, open all blinds, turn on every light (including lamps), remove personal items and family photos, and park cars off the driveway.
Should seller be home during photography?
Ideally no. Most agents provide lockbox access. Fewer people on-site means the photographer can work faster and stage more freely.
How much time should I allow for staging prep?
Plan 2-3 hours of seller prep the day before. Decluttering, light bulb replacement, and final cleaning all make a visible difference in the finished photos.